

Someone at Monkey Bar Storage must have noticed the chaos in the background of my past posts when they decided to send help. Contrary to my former belief, I've learned that a Monkey Bar is not just a place where simians gather to get drunk. It's is also more than the weather-beaten, schoolyard construct responsible for generations of preteen broken bones. Rather,
Monkey Bar Storage is a modern manufacturer of ingenious garage storage and organization systems.
The garage is my man-cave, but it's a huge mess. Since it hosts my workshop, our laundry room, and our long-term storage, every square foot is critical real estate. My long-handled tools are part of the problem. I have them stored in a feeble attempt at wall-mounted organization in the back corner, near my miter saw station , scrap wood box and a heap of now unused strollers. Monkey Bar Storage sent me one of their DIY organizational solutions, the "Garden Tool Rack" to try out for you.
Perfect! On to the clean-up!
Keeping my hands firmly in the 10 and 2 positions.
This is not a sponsored post, but Monkey Bars did provide the tool rack for review. The experience and opinion is completely my own.
I pulled the cheap screw-in hangers from my gorgeous , mismatched OSB wall covering (obviously, a high-end custom finish). They've worked OK, but require an intricate game of Tetris puzzle placement in order to get the tools back up after use. When I've bought a new tool, I've had to move hooks around to re-jigger the layout. Generally, I just chuck them in the corner.
Hmmm,... future nail gun hook?
The next step was to locate the studs. This is an easy enough task with an inexpensive stud finder (unless you have a sheet of OSB screwed to the wall over the sheet rock, then it's darn near impossible).

"Come on Mr. Stud. Show yourself!"
The first end bracket was attached with the included heavy-duty, coarse-threaded screws. Instructions are hit the stud on center in order to fully secure the bracket. The mounting holes are slotted, so leveling is easy.
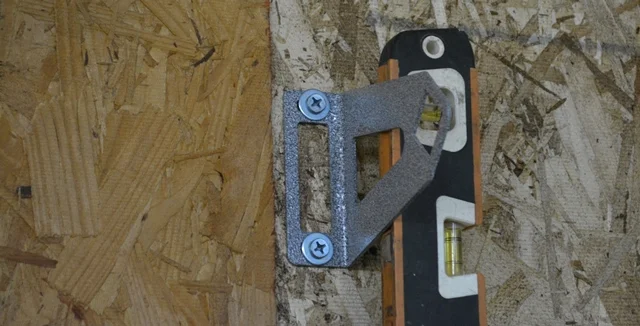
OK, I'm going to level with you...
Monkey Bar Storage provides an easy trick for installing the second bracket approximately 48" away horizontally. Simply attach the cross bar and second bracket and slide it up into place until level (I used a magnetic torpedo level), then mark the holes to pre-drill for the screws.

One of the cool features in this system is the spring loaded double button that traps the hanger bar, keeping it from slipping off the bracket when you are doing an emergency, rapid deployment to the front yard with your landscaping rake.
Spring-loaded, button-lock-a-ma-jigger
The other end slides freely to accommodate infinite variations in wall stud location. I really appreciate the plastic caps in the ends of the hanger bars. These will inevitably save me from embossing a diamond shaped wound in my forehead at some point in the future. All the parts are steel, with a tough, textured finish, which I suspect is powder-coated (?) I didn't scratch it at all during my installation.
This particular kit comes with an assortment of heavy duty hangers to clip and adjust wherever desired on the hanger bar. It includes (1) 12" Hook, (2) 3" double hooks, (1) 3" single hook, (1) 3" wide hook, (2) 5" wide hooks, and (1) J hook.
You can buy extra hangers for the system, including specialty pieces for skis, bikes, golf, sporting goods, and extra tools.
Captain Hook would be jealous.
Check out the difference between these beefy monkey hangers and the cheapsters I was using before. More than one tool can easily sit on the larger hanger.
The old one probably won't even hold a single monkey.
The bar is angled, so the hangers clip on tight. The weight of the tools holds them firmly in place, but thet're easy to adjust later simply by pushing them upwards.
I love another slick feature; lesser-used tools can hang behind the rack, nearly doubling the storage capacity per linear foot of wall space.
Using just those first two hooks, I hung almost everything that had been attached to the wall in only about 12" of rack space!
Once I got going, I wanted to grab all the long-handled implements of destruction I could scrounge up. I even had good place to hang a bunch of extension cords. Sweet!
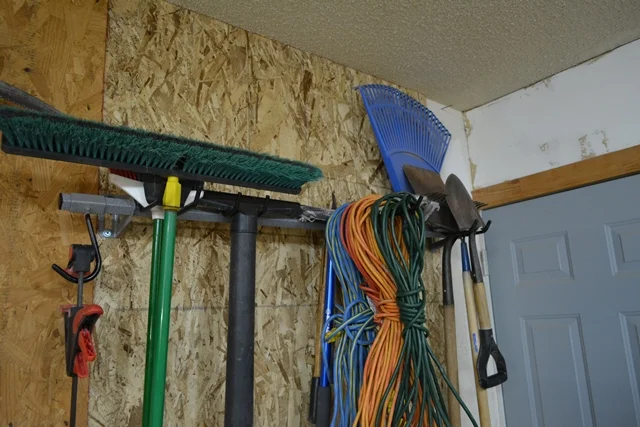
The corner is much neater and I've loaded even more tools in the space. It's tidy and easy to access.
BEFORE

Mess, mess and more mess.
AFTER

Broom, push broom, shop vac wand, bar clamp, (3) extension cords, 1/2" conduit bender, 3/4" conduit bender, short spade, flat blade shovel, landscape rake, leaf rake, branch cutters, drywall pole sander, and room for more!
For about $100, I chalk this system up as a clear winner. It's compact, heavy-duty quality, and super easy to install. I had it up and fully-loaded in about 30 minutes, including the time I spent screwing around trying to locate the studs.
Happy organizing my friends!

I checked out their website ; Monkey Bar Storage offers more DIY products as well as professionally installed, custom storage solutions. They serve both the United States and Canada. You can find your local dealer here , including our local Phoenix, AZ branch.