

This is really part 2 of The Window AC unit saga. Here’s part 1, if you need to catch up. I’ll wait.
So Where Were we?
When last we left you, my son and I had just installed a new, window AC unit through the wall and gotten it working. Deliciously cool air was flowing, just as the last gasps of Phoenix’s summer heat started slipping away. All that was left was some paint and trim.
We never did finish. The Homeowner’s Association had sent a friendly reminder within a few days of our initial install.

Yeah. There was a photography included with the letter too.
“We noted an A/C unit has been installed along the side of the garage. Please remove the A/C untit per the 2010/2011 A/C Unit Enforcement Policy.”
I made a feeble attempt with the HOA to keep it, “It wasn’t installed in the garage, it’s a bedroom”.
It didn’t really matter. I read the policy. They’d changed the rules after we’d bought the house; we didn’t know about it. There it was, in black and white.
It really didn’t matter; what we’d done was technically wrong and we’d have to undo it. The HOA has our collective best interest and property values at heart. A clunky AC, visible from the street, just wouldn’t cut it. Dang it.
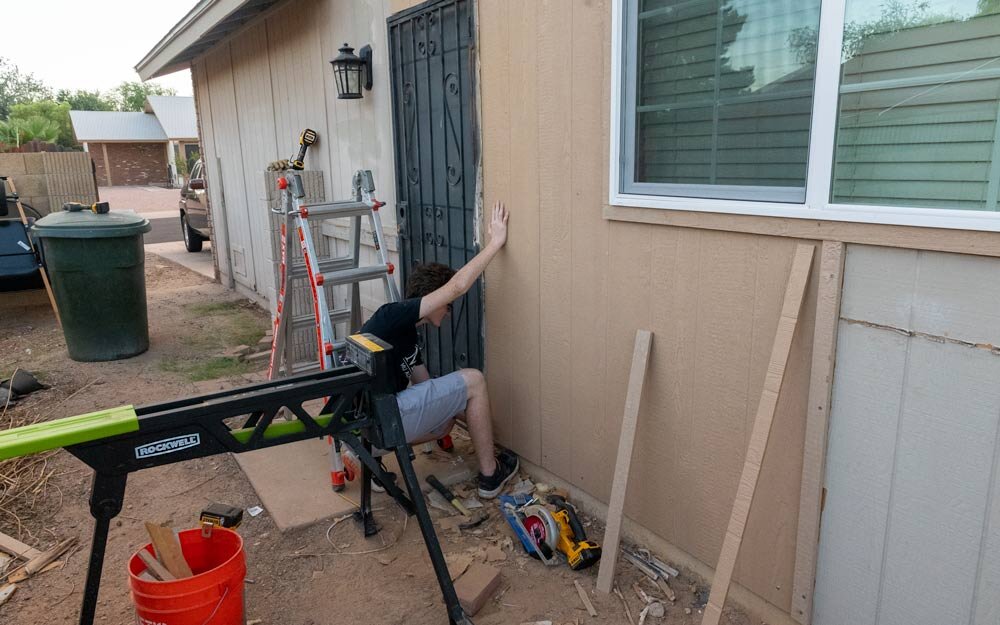
We’d have to tear it out. It sure would have been nice if we hadn’t just torn a big, damn hole in the side of our house that would need to be repaired. That made it a big project.
Demolition is the best kind of molition
Our delightfully, sun-faded, T1-11 siding is a 4x8 sheet product. Unfortunately, we’d created our brand new air-conditioning unit hole, smack-dab between two sheets of the stuff. They’d both have to be replaced if we didn’t want to put a stupid-looking, ill-matching patch over the hole.
Our son Jack and I started our morning after breakfast with an assortment of hammers, pry bars, and my classic rock playlist ripping from the DeWalt music system (affiliate links - thank you!).

I believe it was Bob Seger that started the day with us, if you must know.
Plugging a the hole became one of those ever-expanding kind of projects. Removing the two full sheets also required ripping out the odd-shaped trim pieces around the window.
We’d have been so much better off not doing the AC install. We could have gotten away with a small, portable unit.

Making a mental shopping list
Both sheets of siding needed to be trimmed substantially. The doorway that leads into the garage, needed a large cutout in the left sheet. The existing window would also require need a big ol’ notch removed from the right sheet.

That’s not cotton candy kids.
When we’d pulled the trim and siding off around one side of the window, we realized there wasn’t anything holding it in place but the nails we’d just pulled. It was just popped in a raw opening.

Wait,… that’s indoors.
While we’re at it…
Project creep continued. A quick search found us a proper sized window in stock locally. The price was an attractive $178. I don’t know what the long term quality of the vinyl window is, but a modern, double-pane, gas filled one would keep the room much cooler than the original, 1970’s single-pane aluminum one. Plus, this model had mullions like the one I added in our daughter’s closet.

In stock and less than $200. Sold.
Replacing the window would make the siding install a lot easier. We ripped off the rest of the trim, popped the nails and carefully lifted the old frame right off the wall.
You wouldn’t think so, but this step can be dangerous. I knew a dude that broke a window while removing it and got seriously slashed by a big piece of glass. He survived a serious bleed, but ended up getting hooked on painkillers and nearly destroyed his life. Please take it slow and easy; get help when maneuvering these old windows.


Since the old siding was tucked up under an overlapping sheet from above, I needed to slice a bit off the new sheet to shorten it. I was not going to attempt to pry that top sheet back and risk breaking it.
I absolutely love any excuse to break out my Kreg KMA2700 Circular Saw Track to cut straight lines in sheet goods. I don’t need one of those expensive track saws with this baby.

We nailed the sheet of siding up, overlapping the window opening. Rather than measuring and marking for a cutout, I slid my osculating multi-tool along the inside of the framed opening and buzzed out the opening precisely.

The siding comes pre-primed. It almost matches the house!
In hind-site, I think we screwed up a little with waterproof flashing tape. The way we did it is certainly better than the layer of absolutely nothing that had been there before, but I think I should have overlapped it on top the window flange, rather than underneath it.
Still, it was going to be a lot better than the previous install. The tape is a peel-and-stick asphalt membrane that has some stretch to it. We wrapped the opening like a present, cutting the corners and folding them inwards.

A sticky situation
We added an additional, overlapping piece into each of the corners, stretching it to a 90 degree bend.

I’d need to clean that old caulk residue off.
Before popping the window into the opening, I laid a heavy bead of 100% silicone caulk all the way around the back-side of the nailing flange. We leveled and secured it with stainless-steel nails.

Don’t miss!
Between the tape, the silicone on the flange, and another healthy bead of silicone on the trim, I think this thing is going to be fine, perfectly water-tight.
Since this is a nearly unseen side of the house, I didn’t get fancy with the trim. I made it out of the cheap, pre-primed batten boards that match the siding.

Caulk’smanship
I put the vertical trim on first so the simple butt joint between them and the horizontals would be covered; there’d be no gap facing upwards towards the rare, Arizona rain cloud. I popped them in place with my finishing nailer.

“skadoosh!”
We only had one shot with the sheet to fit around the door. Despite my illustrious history of measuring twice, cutting once, and going back to the store to try again, I managed to do hit the marks and get a good fit.
It still took some grunting to get it perfectly in place.
As the day faded into dinnertime we installed the batten boards between the sheets, each with a generous bead of silicone behind it. Because we’d lost that overlap at the top I decided to slip an extra, horizontal piece right at the seam. It wouldn’t be very noticeable, but would give an added layer of protection against rain.

Close.
We’d repaired the wall, but I still had to get it back to original appearance or the HOA would have my hide.
Paint gunnery
I am a boy that likes toys. I love to save up a gift cards and buy DIY toys to show you. In one of these efforts, I’d picked up a sweet, paint slinging sidearm and tucked it away before the summer heat rolled in. I just hadn’t had a chance to try it out yet.
This, my friends, is the Graco Ultra Cordless Airless Handheld Paint Sprayer 17M363. Compared to some truly great homeowner grade paint sprayers, this is more of a pro-level unit and comes at a significant price point. It’s an indulgence. However, I chose it for several reasons: reviews were good, it uses pro-grade spray tips, it can spray any angle, including upside down, and no paint-thinning is required.
Of course I chose the cordless version. It’s powered by DeWalt and ships with two, 2 amp hour battery packs. I’m already using the Dewalt cordless ecosystem and will love having more of these smaller, lighter batteries around.

A Frankenstein hybrid of Graco and Dewalt
The day before I brought sprayer out of storage, I ordered a larger paint cup system for it. Since I’d be spraying a big wall area, I wanted to cut down on the refills. The 42 oz bigger cup is 10 oz larger that the one included with the unit. For some reason, my local Home Depot only seems to stock the 42 oz liners, so it will be easier to run out and grab the right ones whenever needed.

Fat Man and Little Boy
I knew our walls were seriously faded and that our original color code would be way off. I took a scrap of the busted up old trim down to the paint counter and had it color-matched.
One of the reasons I hate painting is my complete inability to pour the stuff without making a big, damn drippy mess. I’ve never been able to manage the skill. This failing is the core of my poor self-esteem and belief that I am a complete and utter failure as a man. Now you know my secret; this whole DIY Guy thing is an absolute sham.
Please disregard the above paragraph. I spent a couple bucks on a reusable, silicone paint can lid with a pop-out, pour spout. All is right with the world!
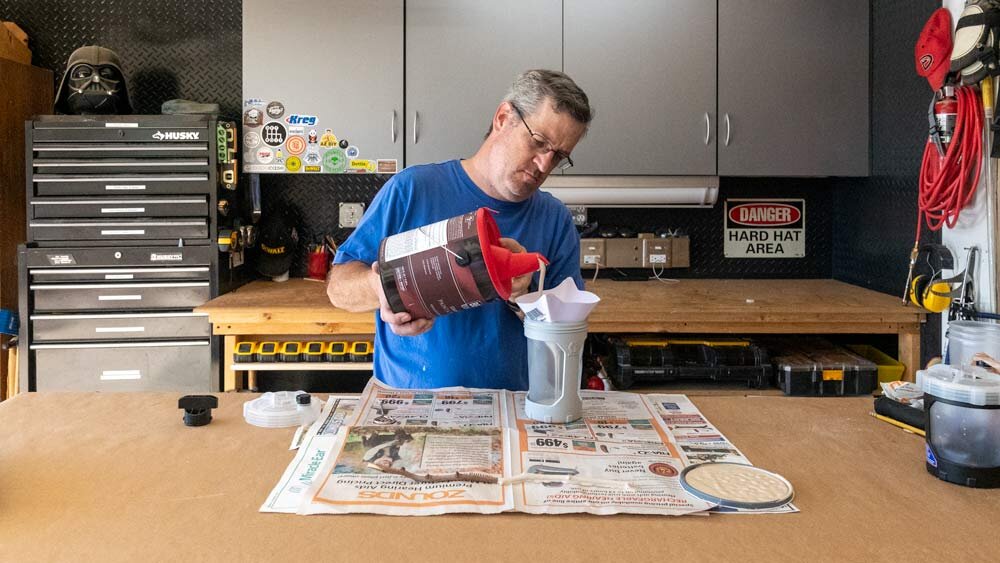
Pour me a tall one Sam
Since we’re all friends here, I’m going to admit something else to you. Despite the fact that the Arizona Republic rises their absurd subscription cost every other day while delivering an increasingly thinner newspaper with delightfully reprinted or incomplete articles and editorial views from another time period, we still take delivery. My wife likes the tactile feel of an old school paper in hand. As ex-paperboy from the olden days, I do like the smell of newsprint, plus I have another good use for it…

The Arizona Republic, just for the articles
I’d put on my sexy, floppy hat and my old paintin’ shirt, but there really wasn’t over-spray to worry about. It took two coats and 3 refills of the cup to cover the area. To blend into the existing wall, I shot the edges at an angle, feathering the paint out a couple feet down the wall.

The Graco Cordless Airless Handheld Paint Sprayer in action
The sprayer did a really nice job. Actual painting took moments. Cleanup took three times that, but it was worth it. It turned out great.

Peace baby
Loooooong story short, no one could tell we’d done our little “practice” project.
If you’ve got the time and money, tearing though an exterior wall to install an AC unit, then removing it and repairing the damage can be an enjoyable little life diversion to wile away a couple weekends. It’s for those times when you have nothing better to do.
At least we upgraded the window

Don’t touch. The paint’s still wet.