How to fill in missing tiles by scavenging
Way back,… way, WAAAY back, 3 years ago, when the kitchen remodel was still a contemplative twinkle in my eye, I knew that changing the the kitchen footprint would bring untold trouble with the flooring. I wrote about it before the the kitchen was even designed in KITCHEN REMODEL: THE MISSING FLOORING TILE CHALLENGE.
This is: Kitchen Remodel: Episode 36
Without any real solution, I dove headlong into a massive remodel anyway, obviously more idiot than genius.
There was going to be a problem under that window.
Que the highlights montage …
Now, with nearly all else done but some minor trim and some paint. I’m at the point where I have to face the tile problem. In a nutshell, changing the U-shaped kitchen into a galley left a maw of missing flooring. I searched and searched, but could not find a source to replace the existing tile. I couldn’t even positively identify the stuff, other than that it was a staple of the big-box stores in the late 80’s to 90’s.
So I sketched out a daring plan on the floor. I figured it just might work.
If I could perhaps rescue a few intact tiles and combine them with the few chipped and broken pieces in the garage, maybe, just maybe, I could scavenge enough pieces to fill in around some sort of new, central mosaic (totally my wife’s idea!). I figured we could find something smaller to fill it in using a similar color tone. With the new exterior door, it could look intentional,… like a welcome mat.
The place looks gorgeous, except for the gaping hell-mouth over there.
With the existing tile being set at a 45 degree angle, I’d need a whole lot of pieces to fill in around the edges of my planned mosaic space. Plus, I’d have to pull up some of the existing tiles and replace them were they cut to butt up against the original cabinet bases.
Scavenging tile from around the house
I thought I could pull tile from a closet and then fill it in with something else. Again the 45 degree placement was an issue. In our hall closet, there was not a single, whole tile. I needed two or three perfect ones.
Just like the kitchen, my DIY predecessors didn’t tile under the bathroom vanity so I couldn’t salvage from there .
In the end, I kicked the can down the road and forced my hand into yet another future project. Our little home office room is on the future remodel list. I’m going to install cabinets in there; it has a fully tiled floor!
So a year or so ahead of schedule, I shoved everything in our messy office over to the left and beheld some beautiful and and ripe-for-the-picking, whole tiles that would fit under the footprint of future built-in cabinetry.
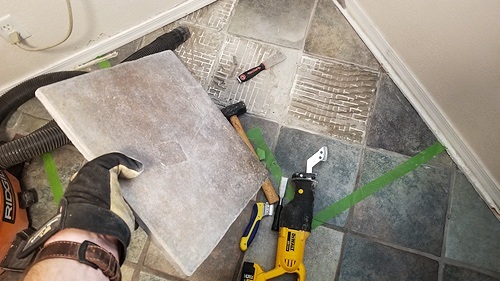
I taped off the footprint of those future cabinet bases and started merrily popping up tiles.
“Merrily Popping Up Tiles”
It’s not exactly a merry experience. It’s tedious as heck and very stressful. I really couldn’t afford to beak a single, whole tile. There just were not many to be targeted. The trick would be to take it slow and not rush.
I used a grout saw blade mounted in my reciprocating saw to do the initial work. It was a ton faster than the handheld grout saw I’d initially tried initially.
Forget muscle power, this is why we have bad ass cordless tools.
After cutting the grout, I carefully chipped what was left with a hammer and old screwdriver. Once it was out of the way, I took my time very slowly tapping a putty knife in around the perimeter, never forcing anything. Eventually, the tile would pop free. When it happens, there’s nothing like it. Success. Joy. Relief.
Once I recovered some tiles from the office, I moved into the kitchen. I had to remove some partial tiles to fit whole or larger pieces. These were easier to remove because the floor still had some old stick down tile adhesive residue beneath them, and didn’t stick quite as tightly as their office brethren. Sometimes, poor workmanship by your predecessors is a good thing. The exposed edge didn’t hurt either.
It’s still tedious. Check out my little the video to get a feel for the process:
With the mortar bed breaking free from the floor in most cases, a ton of it stayed on the tile. That would never do for a reinstall. I took it all out to the garage for a cleanup. Now let’s really talk about tedious.
First I gently tapped free whatever I could with an old screwdriver, loosely held.
tink, tink, tink…
I alternated chipping with that screwdriver, and old chisel, and a flap disk on my grinder. Safety glasses were a MUST. Pieces of rogue mortar pinged all over the place. After a few minutes, I realized I wasn’t wearing a dust mask. I could taste mud in my mouth; I’m sure it was lovely for breathing. I popped on a good mask, turned on a floor fan, and opened the garage door.
I’ll take care of your dental work too. Half price!
I ground, chipped, chiseled, scrubbed and picked at the pile of scavenged tile for what felt like forever in the hot garage, until all of the pieces were cleaned up.
After they were all cleaned up, I brought out all the assorted pieces and started laying them roughly in place. It’s an odd task to try to match poor workmanship in such a way that it looks uniform. None of the super-wide grout lines in the entire house are even. I had to match that. Random. Imperfect.
It might just work.
I’m going long here, so watch this space for part 2. I’m going to cut these tiles, figure out the mosaic, and finish the job.
UPDATE: Here’s part 2! A Tile and Stone Welcome Mat


