


Reviewing the Kreg R3 JR. pocket hole jig. Simply awesome!
Read MoreAttack of the Irrigation System
 So I thought I'd be a nice hubbie this morning and run out to get the paper for Sweetie. It was actually supposed to hit freezing last night, so I braced myself for the cold, dark dash to the curb. I opened the door to realize it was raining, lovely. As I raced out from under the awning, in my flannel PJ pants, and ran down the bone-dry walkway, my sleep addled brain to turned me around to look for the single rain cloud parked over the front door. Instead, there was a geyser, spraying from the ground, raining ferociously on the roof.
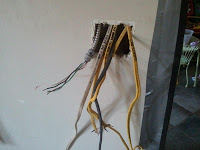
 It took a minute in the dark to find a irrigation line protruding from the ground with a nice little split in it. Craaaaaaaaaaap! Happy New Year's, old bean. So much for a nice Daddy breakfast. I get to play in the mud at a balmy 36 degrees this morning.
"Ferb, I know what we're going to do today!"
-Phineas
 |
| See? I'm delighted! |
 |
| Yep. Deee-lighted! |
I broke the news to Sweetie, got dressed and headed out; the sun was up. I hit the water on again at the controller. Yep, a busted 1/2 black line, just barely breaking the surface of our desert landscaped front yard. A gusher, but not black gold or Texas Tea here. Twenty minutes of this on a watering schedule is a bunch-o-water, down the tubes. There isn't even any plant life anywhere near it to benefit from the dousing. Probably just a nice clean spot on our roof.
 Another little bonus I uncovered is a 1/2" PVC Electrical conduit. I have no idea where it's going, but it's not at 18" depth where it should be, more like 6". Nothing I can deal with today. I've never messed with this drip irrigation line before. It branches 1/8" runs out to little drip nozzles near the plants. I'll have to install two of these branches in the section I dug up. Off to Home Depot I go, 8:30 am on New Year's Day! Woooo Hoooo!
  |
| Sent a geek to do a man's job |
 |
| Exactly 1 bunch of stuff. |

The tubing cut with a utility knife. The pressure couplings worked pretty good. Pressure held nicely. I used the little punch tool to poke a hole in the tubing, and stabbed the little 1/8" connectors in the side for the branch line. It's too easy. It took me longer to dig the hole and expose the line than it did for me to repair everything. With the water back on, everything held nicely, maybe a little sweat drop of leakage at the connections, but nothing serious.
I took a little time making sure there were no rocks against the tubing as I buried it a bit deeper than I found it. I filled in the trench, tamped it down a bit and took the rake to the area. DONE!!!

Happy New Year to all!
Review: General Tools EZ Pocket Hole Jig
I picked this pocket hole jig up at Home Depot because I had a couple gift cards burning a hole in my pocket.

The General Tools 849 EZ Pro Pocket Hole Jig Kit as described on their web-site:
“What have I got in my pocket?"
- Bilbo Baggins*
I have haven't done a lot of pocket-hole joinery, but I have done a bit. I had a really good experience using a dedicated Porter Cable Machine about a year ago, when taking a community college woodworking class. It was pretty sweet; I blasted out at least a couple dozen holes in just a few minutes, each was perfect. I've also done them on my Shopsmith, using the horizontal boring mode with the table at a slight angle. That's fine, but a little laborious. Looking at the General Tools kit, for about $40, I figured it would do the trick.
The General Tools 849 EZ Pro Pocket Hole Jig Kit as described on their web-site:
The E-Z Pocket Hole Jig Kit! Before embarking upon your next project, be sure to grab one of Generals E-Z Pocket Hole Jig Kits. The innovative design allows you to create three popular types of pocket hole joints with accuracy and relative ease. Made of heavy duty aluminum, the Jig can be mounted to a bench for stationary use and also includes a clamping system for when portability is desired. A great choice for building cabinets, furniture or other high precision woodworking endeavors. Includes free DIY project plans!
 |
| It looks nice though. |
| The clamshell plastic box is decent enough but the divider is terribly lightweight. I can see it ripping up in short order. You get some screws and dowel plugs which, along with the box, is what makes the kit I purchased the deeeeeeee-lux version. The jig itself seems to be constructed pretty well, nice and straight without sharp mold marks etc. The stepped bit seems good. The long Robertson tip driver bit seemed a little goopy with its chrome coated finish. Here's the deal. I tried it out. I'm not going to rave about it. It performed for me reasonably as advertised, but I just wasn't pleased with it from a standpoint that I had dropped 40 bucks on it. I also thought it would not be a long lasting tool.
If you want to give it a whirl, Amazon has the kit I bought here and a less expensive version here, without the screws and dowel plugs. I took it back. I almost never take stuff back. I like a quiver of gadgets in my toolbox, even if I barely use them. But, I'd hang on to this for $19.95 tops. I hate being negative, but here I am; it just doesn't do it for me. Search "Pocket Hole Jig" and you are bombarded by Kreg products. The DIY Blog world seems to have a near love affair with their stuff. It looks pretty good. At some point I'll give that a try. Sure it's expensive, but they have one at 40 bucks, so maybe I'll give that a whirl.
*The above quoted text belongs to JRR Tolkien & co. No copyright infringement intended. |
The Great Family Room Remodel - Part IV
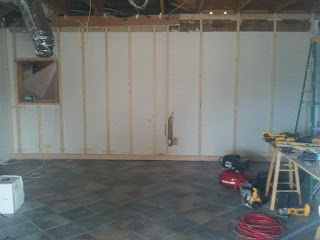
One last big weekend of atop a ladder leveling and insulating the ceiling before the end of my time off of work. Major problems are solved and this project is taking shape.
Workday 9
I went with leveling the ceiling using kiln dried 2x4's nailed to the side of the framing members. After much thought and a couple conversations with the resident "expert" old dudes at Home Depot, I thought it would be better. They are bit wider to nail to, will split less, and were much straighter than the 1x material I was looking at. Believe it or not, the price was about the same.
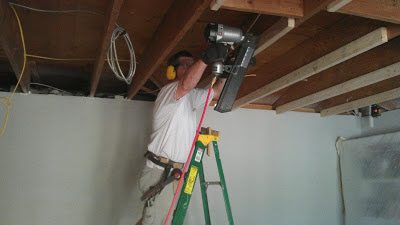
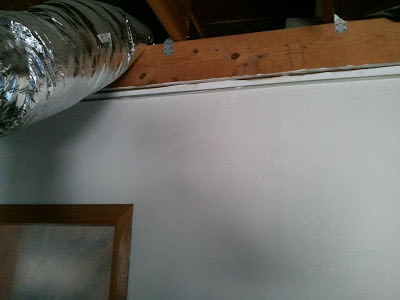
Why did I still have that sheet rock saw on my belt?
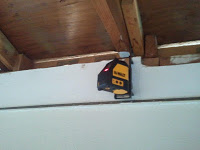
I made the little wooden T-Square that's sticking through the top of the ladder in the picture. There's a pencil line around the vertical, hanging part. I'd hang it off the 2x4 and adjust height until it lined up with the laser. I'd throw on a quick clamp, hang on tight, and zap it with the nailer. Skadoosh!
The whole room had dead level framing members in about half a day. There's no way I could have done it alone, without a nailer.
I moved into wiring can-lights. We're going to have more than just the ceiling fan for general lighting. I plan to use dimmable LED's, if the light color isn't too harsh. The new work style cans were about $60 at 'Depot for a box of six, including the trim rings (which I threw away).

From this angle, you can't tell my head is shaped like a toaster.
The LED's I want to use only require a small octagon box, but I want to have the option later to go for a full can light.
I had the whole electrical diagram sketched out in advance. It's easy to get lost with all that spaghetti in the ceiling and miss a crucial piece. There's will be no attic access in this room, so recovering from a stupid omission would be darn near impossible.
I love Moleskine notebooks. They are fun to flip through months after a project is completed.
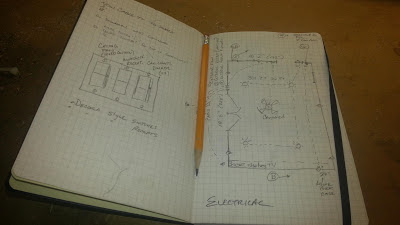
It takes a plan to be The Man with a Plan, so here's my plan,... man.
For this same reason, I ran good speaker wire from the entertainment center area to the walls and buried it, just in case we want to install a surround sound system in the future.
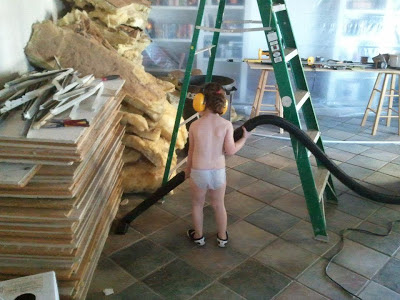
In an attempt to get ahead for the next, and last, full workday before "vacation" is over, a late run for insulation was in order. I brought Jack as the loading crew; I told him it builds character to load a truck.

Lift with you knees boy!
At 6.5" thick, R-19, it's not quite as thick as recommended for ceilings in the blistering hell-fire heat of Arizona, but we are nearly doubling the thickness of what was up there, just 3.5".
Workday 10:
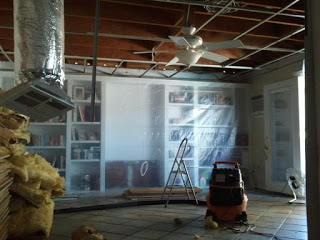
The insulation is up and mostly sealed with tape, except for the East and West tapered edges. That will take some extra framing work to create a nailing surface to fasten the ends of the planks. I left a few inches above and around the soffit vents for air circulation. I also kept the craft paper backing away from the can lights (which were rated for direct insulation contact), just in case.

Burn baby burn,... lights that is.
The can lights work with temporary compact fluorescents installed to test. There is already a change in temperature. It's staying cooler.
It's Sunday evening. I'm out of time and not completed. Vacation is over; I have to go back to work tomorrow and have evening commitments most nights. Time to clean up a bit and aim for substantial completion next weekend.
I really thought I'd be relaxing with a completed project the last couple days of my vacation. I clearly underestimated the amount of work this project would take. I figure I'm at about 85% complete and I'm tired...

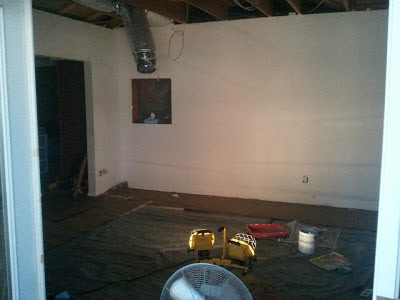
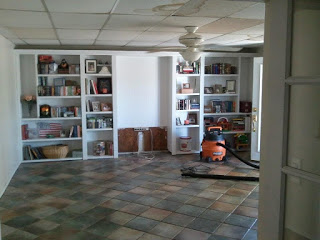
Cleaning up for the week. So that's what the floor looks like again.
The "vacation" blitz-week is behind us. Now we have to shift into pure weekend-warrior mode.
- This project will be done in another day or two tops!...right?..right?
- We're coming in under budget!,...right,...right?
- What new tool comes out next?
Visit us next time, hero's and villains, for the next stunning chapter of America's favorite: The Great Family Room Remodel - Part V


The Great Family Room Remodel - Part III
Leaping headlong into the a large-scale dry walling adventure, I learn a lot,.. and it gets messy. It's really not that difficult of a job, but it's also not the most fun of the DIY tasks I've tackled.
Work Day 5:
The wall is mostly skinned with sheet-rock and the electrical receptacles are adjusted forward. I made a big mess, wore myself out, and really didn't have much fun. I learned some things I'd probably do differently next time. After much study and consideration, I have come to the educated conclusion that I am not a rabid fan of the dry wall installing arts.

This was only the second full-day workday, but I don't feel like I accomplished much. It's probably due to buying, loading, and unloading all that drywall. I simply must pick up the pace tomorrow. I did enjoy the time I took to grab a "Bad Dog" Italian Sausage, Chips, and a Coke combo from the stand in front of H' Depot.
I tried a drywall dimpler driver in my impact driver, (BTW - of the most awesome tools ever) by but didn't really like it much. A simple magnetic driver tip did the trick. You can still see the header sticking out at the upper left. I'm skinning it over with a thinner 1/4" sheet of sheet rock.
Workday 6:
Another grueling day of drywall. I had to fix and add a bit of framing here and there. The new wall is getting close to finished. Another coat of compound and a sanding, it will be ready for paint (primer?). I'm using sanding screens purchased from Amazon.com on a Kobalt sander / stick thingy I bought at Lowes. Both worked pretty good. My shoulder muscles are begging for mercy. If I had it to do again, I'd look into some sort of vacuum equipped sander. The dust gets everywhere,... EVERYWHERE!
This back, outside wall is going to be a trick. I started cutting a nice neat line where you see the laser from the awesome DeWalt Laser Chalk Line. The dang wall crumbled about an inch lower, at the top of a sheet, right where they had nailed the edge track for the suspended ceiling. It was a thick gob of drywall compound the length of the room, leaving a ragged edge.
As a little bonus surprise:
(Future Challenge #1)
I found three 4" electrical junction boxes hidden up there, with the covers facing the opposite direction where I couldn't get into them. No cable clamps either. An illegal installation / code violation, by some putz ahead of me. I'd already sealed up and finished the wall with the previous box so I can't easily run new wiring at this point. I'll have to move on with the project. I've mapped them out and will open up the house's exterior sheathing later to fix it. Who'd do that Jake-leg wiring crap in their own home and leave it like that?
Workday 7:
The drywall is finally completed. No more header sticking out! There were a couple old places I'd liked to have given some more attention, but the clock is ticking.
My lovely wife took a couple days off to help.
The back, outside wall's existing texture was so rough it would scrape the skin off a passing rhino. Sweetie spent hours first sanding with the screens then used the random orbital sander with a heavy grit paper to knock down the horrible texture.
She sanded, and sanded while I mudded and cut in the new sheetrock, filling the strip around the top of the three remaining walls. My poor wife seems to be allergic to drywall dust. She's feeling miserable.
See the lights? Because it's flipping DARK! No more leisurely afternoon completions, we're burning the midnight oil and we're exhausted!
Workday 8:
<Ozzy mode = On>
I... am...TEXTURE... MAAAAN!...
nuh-nuh-nuh, nuh-nuh-nuh-NUGHT!
<Ozzy mode = Off>

Nice Shootin' Tex
This little Wagner "Power Tex" texture sprayer blows chunks!.. in a good way. It's worth it's weight in gold. Not counting tarps and taping the room up, it took one hour to shoot the whole room. That's from taking it out of the box, thinning the compound, practice in the back yard, and two cleanups.
Done!
It looks pretty good too. I blasted it over the formerly rough / now sanded wall, the new flat wall, and the one with the weird troweled texture. It's all a spatter-ish / knockdown texture now.
No compressor, just a small electric turbine + thinned drywall compound = nice textured walls and one heck of a mess on every surface in four of the surrounding States. Next time I'll wear a hat and keep my mouth closed. That stuff tastes like... unpleasant.
We got a quick coat of primer and two coats of paint on the wall before shutting down for the night. It looks pretty good.
Now that this dark chapter is behind us:
- Are you sick of hearing me whine about #&$*%#$!!! dry walling?
- Wanna' see that big bad nail gun come out to play again?
- You like gladiator movies Timmy?
Well then kiddies, tune in next time as the most exciting adventure of our times continues in: The Great Family Room Remodel - Part IV (A New Hope)


The Great Family Room Remodel - Part II
The remodel gets truly underway. I unleash an unrestrained fury of cleanup, rough wiring, and hard-core, precision nail-gunnery.
Spoiler Alert!
If you've stumbled into the mess without first reading the exciting prequel to the saga, head over to
The Great Family Room Remodel - Part I
April 21, Workday 2:
Pretty much a cleanup and haul out day. There were mountains of stained ceiling tiles, heaps of itchy, dusty insulation rectangles, and a mess of twisted metal t-track to get rid of. I had Gracie, the little "helper" demanding to be part of the action. It slowed production; I had hover to make sure she didn't hurt herself, but I wouldn't have it any other way. It was some good old Gracie &Daddy fun time .
Sometimes on these DIY remodel projects you just have to
swallow your pride and bring in a seasoned professional.

Today, I had an apprentice Electrician.
Workday 3:
Jack helped feed a couple cables to feed existing lighting on the back porch. He was a big asset, while Mommy kept the little dynamo occupied in the other room. With an open ceiling it's easy to route the new cable around the room. It's a 20amp circuit, so I'm using 12/2 wire (2 - #12's plus a ground). We're going to add switching next to the French doors for the patio, rather than the opposite side of the room where my predecessor put it. We're taking this opportunity to get the switching the way we want it.

Gracie got ahold of the camera.
With workday #3 is complete, it's the last day of my pint-sized superintendent being underfoot; she's back to pre-school tomorrow. Basic rough in of electrical is complete. New cable TV / Internet home runs have been pulled through the attic (at a delightful 102 degrees today). A new data cable is installed from the office internet router to the X Box under the TV. A new phone line is coiled in the attic for a future expansion.
Raticus Nesticus
The rats-nest will be a 3 gang switch box. There will be switching for can lights, the ceiling fan, and a receptacle above the bookshelves for holiday lights or maybe a string of rope-lights for ambient lighting. There are also cables from here to the back patio door area where I'm relocating switches for exterior fixtures.

Green baggin' it today
Workday 4:
Jack's hanging out with the Bagster Bag before heading off to school. All the old insulation, tiles and track fit, no problem. There's still some room for topping off. $29 for the bag at Home Depot, about $100 for Waste Management to come get it.
We have an empty room to work with.Blitz Week begins. 8:00am and it's already 90 degrees. I have the castle to myself.

Skadoosh!
I decided to fur (furr? phurr? pfurr? ) out the wall with 2x2's. I don't know the best way to hide that header, but this is what I chose to do, for timing. I'm really sold on the new framing nailer. I'm running it with a 2 gallon Porter-Cable pancake compressor, sitting outside to keep the noise down in this unfurnished echo chamber. Compared to using a hammer and nails or driving screws, it just gets the job done, right the heck now. Plus, it's good fun!
I like to say, "Skadoosh!" when I pull the trigger. I managed to still feel manly when saying it due to the good 3 day stubble beard.
A tidy worksite is a happy worksite
Done for the day. The wall is furred out. Only nailing to the studs inside the wall, it's weird that half the wall is 24" stud spacing while the other is 16" spacing.
I even swept up and put everything away, nice and neat, before the family came home, and met them at the door with a smile. Out for dinner everyone! I'm sure I'll do this every day.
<UPDATE: What an idiot. Later, the project, the room looked a cruise missile hit, and I was working past dark, exhausted beyond belief.>
Overall, a good day with a lot accomplished. I cannot wait to use the framing nailer again. I've had a 3 gun set for a couple years (brad, finishing, and stapler), and they really do their jobs, but this big beast is heavy-duty fun, big board, big nails, and big BANG!
It's a Porter-Cable FR350A Round Head 2-Inch to 3-1/2-Inch Framing Nailer that I bought on Amazon. I did my research first and I'm really pleased with the choice.
Please leave me your comments on the project so far. I'm figuring this out as I go.
Next, I'm looking forward to the experience of large scale dry walling. I've done a couple small projects over the years like patching the removal of an in-wall medicine chest. Easy stuff, how hard can a one whole wall and a 12" band around the top of the room be? <UPDATE: Idiot. Drywall work suuuuuuuuks!>
Check it out in: The Great Family Room Remodel - Part III


Stubble: The Ultimate Power Tool
I've learned a lot from the DIY type shows on TV. There's one power tool all the guys use that just gets the job the heck done. I've had the pleasure to sample and to master it on my own projects. Of course, it's stubble. The ole' five o'clock shadow isn’t quite enough to pull it off; you need a professional-grade semi-beard to achieve success in today's demanding renovation projects.
I support my claim with first-hand experience. Over many trials, I have broken my weekend projects into meaningful data. Then it's a simple analysis of mathematics and production. I have found that I complete 80% of my weekend projects on Sunday, with a healthy two-day stubble. Normally, by Saturday, I'm only halfway through my planned weekend projects, naturally due to the mere overnight dusting of a single-day's chin whiskery on my mug. Coincidence? I think not. Conversely, if I had to appear somewhere on Saturday as a clean-shaven gentleman about town, my weekend projects tended to suffer, when starting fresh on Sunday. It's almost as if I lost a day's work, just because I am elsewhere half the time, in a semi-smooth faced condition.
Features
Stubble actually enhances the brain's neurological problem-solving center. Men are subconsciously trained from birth that a good scratch of the stubble* sends a blast of mental adrenalin to quickly devise an appropriate solution. This knowledge is reason that generations of cartoons have portrayed countless legions of idiots and feeble-minded morons as fools, scratching the top of their heads. They are so stupid that they are scratching the completely wrong side of their head!
Wouldn't you prefer to see your hired electrician silently rubbing his stubbled chin, as he assesses the complexities of your electrical service panel, using his knowing, steely gaze, rather than a smooth-chinned, slack-jawed yokel, scratching his unkempt hair, poking at the panel, glassy-eyed, with a bent twig, "duuuuuuuhhhh...."?
* A proper stubble scratch should be performed with a loose fist-like gesture, palm downward with a good, slow thumb and index finger stroking motion. Additionally, at no time should a single-sided, multi-finger rapid scratch be used. It just looks like a hound trying to dislodge a chigger, and is clearly beneath the status of any true tool-wielding craftsman.
Confidence.
Do you really think you can handle an 18 volt reciprocating-saw, with a heavy demolition blade, while perched smooth-faced and daintily on your eggshell-white step stool, in your khaki Dockers and a Polo shirt? Or are you going to get your grizzle-jawed self up a 8 foot, class III ladder in your Carhartt's and rip through a nail encrusted wall in a shower of sparks, drywall, and burning sawdust? Damn right you are! Confidence man!
The Research.
You don't have to trust my experience. Again, look to the cable TV renovation expert dudes. Nine times out of ten, they're sporting a good, perfectly-maintained stubble. Would the homeowners even trust them to touch their home otherwise?
There's that Property Brothers show where the twin brothers find and fix up a house for a young couple that can't afford to buy what they want outright. One is smooth-ish faced, the other measurably scruffier. Can you guess which one is the realtor and which one knows how to sledgehammer out a non-load bearing wall and create a high-end commercial kitchen out of a musty coat closet full of dead mice?
Even fictional Hollywood handymen follow the rule. Why do you think clean shaven Tim "The Tool Man" Taylor's projects so rapidly imploded into chaos, while the Al Borland shook his head knowingly, luxuriating in his Bob Vila beard?
The only guys that can pull off a smooth face reno without being laughed off the project seem to have decided to go spear bald. I haven't figured it out yet, but the chrome dome look seems to share some of the same powers as the stubble. I'm not yet willing to do any personal experimentation on this aspect.
I further recognize that the cadre of female cable TV fix-it-up experts don't go the facial stubble route, but they seem to finish their work admirably well regardless. I can only surmise by the evidence I can gather from my observations that this is accomplished through one of two methods.
The stubble, employed properly is one of the most economical additions you can use in your shop or work site. The cost is not too overly bad and compares very favorably against power tools equipped with laser targeting. The cost consist of:
I believe the addition of good quality man stubble to your toolbox will improve your work quality and productivity. Give it a try. If all you can pull off is a peach fuzz, or a mangy cat look , perhaps try the chrome dome or the too tight, V-neck lady T-shirt method.
Then again, there is an exception to every rule.
 <UPDATE> Stop the presses! This manly, manly post won the coveted "Manliest link up so far to Man Up Link Up." award over at So I Married A Craft Blogger. Check his site out, a Man's view of the world of craft blogging.
 |
| AZ DIY Guy with full stubble & kung-fu action grip |
I support my claim with first-hand experience. Over many trials, I have broken my weekend projects into meaningful data. Then it's a simple analysis of mathematics and production. I have found that I complete 80% of my weekend projects on Sunday, with a healthy two-day stubble. Normally, by Saturday, I'm only halfway through my planned weekend projects, naturally due to the mere overnight dusting of a single-day's chin whiskery on my mug. Coincidence? I think not. Conversely, if I had to appear somewhere on Saturday as a clean-shaven gentleman about town, my weekend projects tended to suffer, when starting fresh on Sunday. It's almost as if I lost a day's work, just because I am elsewhere half the time, in a semi-smooth faced condition.
Features
Stubble actually enhances the brain's neurological problem-solving center. Men are subconsciously trained from birth that a good scratch of the stubble* sends a blast of mental adrenalin to quickly devise an appropriate solution. This knowledge is reason that generations of cartoons have portrayed countless legions of idiots and feeble-minded morons as fools, scratching the top of their heads. They are so stupid that they are scratching the completely wrong side of their head!
Wouldn't you prefer to see your hired electrician silently rubbing his stubbled chin, as he assesses the complexities of your electrical service panel, using his knowing, steely gaze, rather than a smooth-chinned, slack-jawed yokel, scratching his unkempt hair, poking at the panel, glassy-eyed, with a bent twig, "duuuuuuuhhhh...."?
* A proper stubble scratch should be performed with a loose fist-like gesture, palm downward with a good, slow thumb and index finger stroking motion. Additionally, at no time should a single-sided, multi-finger rapid scratch be used. It just looks like a hound trying to dislodge a chigger, and is clearly beneath the status of any true tool-wielding craftsman.
Confidence.
Do you really think you can handle an 18 volt reciprocating-saw, with a heavy demolition blade, while perched smooth-faced and daintily on your eggshell-white step stool, in your khaki Dockers and a Polo shirt? Or are you going to get your grizzle-jawed self up a 8 foot, class III ladder in your Carhartt's and rip through a nail encrusted wall in a shower of sparks, drywall, and burning sawdust? Damn right you are! Confidence man!
The Research.
You don't have to trust my experience. Again, look to the cable TV renovation expert dudes. Nine times out of ten, they're sporting a good, perfectly-maintained stubble. Would the homeowners even trust them to touch their home otherwise?
There's that Property Brothers show where the twin brothers find and fix up a house for a young couple that can't afford to buy what they want outright. One is smooth-ish faced, the other measurably scruffier. Can you guess which one is the realtor and which one knows how to sledgehammer out a non-load bearing wall and create a high-end commercial kitchen out of a musty coat closet full of dead mice?
 |
| Pop Quiz: Which one is the Realtor and which one can jackhammer the floor out of a basement? Hint: Compare the area between their ears and their collars. |
The real rock stars of the craft sport old school, full-time facial trophies. I'm talking about Tom Silva, Roger Cook, and Norm Abrams of This Old House. Heck, they don't even comb their hair on the jobsite, they're too busy kicking old house ass with their full beard and / or moustache. But this is about what an everyman can accomplish, not a deity of the construction realms.
Even fictional Hollywood handymen follow the rule. Why do you think clean shaven Tim "The Tool Man" Taylor's projects so rapidly imploded into chaos, while the Al Borland shook his head knowingly, luxuriating in his Bob Vila beard?
The only guys that can pull off a smooth face reno without being laughed off the project seem to have decided to go spear bald. I haven't figured it out yet, but the chrome dome look seems to share some of the same powers as the stubble. I'm not yet willing to do any personal experimentation on this aspect.
I further recognize that the cadre of female cable TV fix-it-up experts don't go the facial stubble route, but they seem to finish their work admirably well regardless. I can only surmise by the evidence I can gather from my observations that this is accomplished through one of two methods.
- The use of tousle-haired meathead sidekick carpenter that seems to change every few episodes. These guys are each outfitted complete with stubble, an empty leather tool belt, nail guns and a sliding-compound miter saw.
- The too-tight, V-neck lady T-shirt. You know, the one with the weirdly too short sleeves. I don't understand the science, but there seems to some commonality to their garb on these shows. I suspect that it is the female version of man-stubble and should be attributed the same way to their success. They can't reasonably pull off a successful chin-scratch power move, but there seems to be a maneuver involving the position of the camera in relation to a quick hint of cleavage whilst circular sawing or shooting a nail gun. I truly think it's the tasteful use of boob-age that does the trick. I haven't put it to the test myself because I simply get good results by letting my facial hair grow out a couple days; I don't see the need to work dressed in a too-tight, V-neck lady T-shirt, plus I look terrible in pastels.
The stubble, employed properly is one of the most economical additions you can use in your shop or work site. The cost is not too overly bad and compares very favorably against power tools equipped with laser targeting. The cost consist of:
- The pain of carving it off your face Monday morning as well as the price of blades.
- The uninitiated simply don't realize the toll stubble takes on your wardrobe. The 60 grit sandpaper on your neck tears the heck out of the collar of an otherwise serviceable flannel work shirt.
- The degraded feeling you get when you see that baby-smooth chin in the mirror, your cheeks flush with razor burn and your fresh shaven whiskers laying in the sink, their power ebbing back to the cosmos.
I believe the addition of good quality man stubble to your toolbox will improve your work quality and productivity. Give it a try. If all you can pull off is a peach fuzz, or a mangy cat look , perhaps try the chrome dome or the too tight, V-neck lady T-shirt method.
Then again, there is an exception to every rule.
<UPDATE> Stop the presses! This manly, manly post won the coveted "Manliest link up so far to Man Up Link Up." award over at So I Married A Craft Blogger. Check his site out, a Man's view of the world of craft blogging.
The Great Family Room Remodel - Part I
Finally. It was time to finish the remodel of our horrible family room. We suspect the room was an addition to the house, at least two owners ago, probably in the early 90's. Previous projects had revealed some poor workmanship and stupid install methods. For this room, we've already dressed up the built-in bookshelves, installed French doors, replaced the roof (hired that task out to the pros), and repaired some electrical problems that had cost us all of our entertainment center electronics, one-by-one, over the course of our first year in the home. The ugly, commercial-style drop ceiling is sagging, badly stained, and way too low. I had a week's vacation to tackle this. I figured I'd be done by Friday, sitting on the couch, in the complete room, watching videos. Yeah right.
Look at that horrible ceiling. It's only 7' 5" high. The only reason I can figure it's so low is that the original "remodeler" set an 8' sheet of drywall vertically and fastened the ceiling track down from there a bit. The room is 16' - 2" x 18'- 8" (302 sq. ft.) The TV stand is one of my early woodworking projects. There may be some visible evidence we have an infestation of children in our home.
Ye Ole' Medieval Death Spike
The awful tiles don't even match each other, much less the beige T-track. There is even some nice brittle, yellowed caulk where some creative genius had tried to solve the cupping tiles by gluing them to the track. It is especially impressive that that there are about five different patterns of tile represented in the ceiling.
My number one complaint involves the finial on the ceiling fan. Since I'm 5' 10" this rascal rests roughly 3/8" below the top of my skull.
Some of my most colorful language has been expressed after having forgotten my proximity to this death spike.

Easter Sunday.
The
Armstrong Residential Ceilings
ceiling planks came in, surprisingly over a week early; I thought I'd pick them up ASAP in case of damage or error. The lot is 552 lbs, 7 feet long, and served with a complimentary pallet. I really appreciated
help with the forklift. My trusty
handled it like a champ.
It was 90 degrees today. We start full-steam ahead in 2 weeks. I hope the heat holds off.
Workday 1
: One week before official launch. The family room is cleaned out. You can see the original bookshelf finish color in the lower center. The dining room is now the family room and eating area for the next two weeks.
Plastic sheeting is in place to protect the rest of the house. We're trying out some stick on zippers to make a working, roll-up door.
<UPDATE> Oh yeah, that duct tape later pulled paint right off the wall. Awsome!

The Superintendent of Snack Time
The stick-on zippers from Amazon Home Improvement work great. Just paste them on, unzip and cut the plastic with a razor knife. Grace stopped by on one of her many supervisory visits with some snacks and her shoes on the wrong feet. Next week, I will probably make better production without my little boss.
Odd that it appears they designed the packaging design sometime in 1971 isn't it?
The tear-out quickly is underway. Most of the tiles were two layers thick, no wonder it was sagging. Some mental giant had even tried to caulk them to the grid. The good news is that there is no sign of mold, despite the previous roof leaks. The roofers had replaced the decking in the worst spots.
I'm taking a chance that I won't wreck something on the bookshelves and leaving them full.
<UPDATE> What the hell was I thinking? More on that later.
The tear-out is basically done. There is already a mountain of trash to deal with.

Challenge # 1
discovered: No two ceiling bays are the same width. That's going to make it fun to insulate.
Note that header on the upper left, that delicious slice of wonderful is
Challenge #2
, and it's going to kill my schedule. You can see original roof shingles just above it.
This header for the addition is scabbed on to what I believe to be the original back wall of the house. It's sticking out nearly an inch beyond the face of the wall. Note the edge track for the drop ceiling, just barely below it. This is the reason they set the ceiling so low. I'm going to have to do something about it: box it out?, put two more sheets of 5/8" drywall on the wall and a 1/4" sheet just over the header?, or perhaps fur (furr?) the wall out with 1x 2's and drywall it again. Nuts. Cost & time.
Challenge#2 and flaunting it
Challenge #3
discovered: I knew the floor was out of level; I can feel it. I had hoped the ceiling joists were close enough to level to be able to simply shim the finish planks a bit. Slipping this handy little
DEWALT DW087 "Laser Chalk Line"
up, I discovered there is nothing remotely level up there. There's nearly 2" of variance between the highest & lowest points in the room, with all points represented in between. That's going to be a good cash hit. I'm going to have to install furring strips everywhere. Hopefully, I can still achieve an 8' ceiling.
I discovered the original roof was nearly dead-flat, with 3 tab shingles. In a heroic attempt to nearly solve what must have been nearly as leak-prone as a painted horizontal window screen, our predecessors put a lot of work into giving it a very slight increase in pitch by adding another layer on top. Why they didn't elevate it a bit more, while they were at it, and avoid flat-roof nonsense altogether, doesn't make sense at all. Ahhh... well, at least we have a new 10 year APP modified roof to get us by. I'll keep up with the maintenance.
- Will the roof cave in when I pry that header off the wall?
- Ever seen a grown man cry?
- How the devil will we level out that crazy roof framing?
- Will I be done & watching movies by Friday?
Get all your questions answered and more! Follow the exciting saga as it continues in:
The Great Family Room Remodel - Part II
-
-
-
-
-
-